celestial navigation software

level of difficulty
beginner
intermediate
advanced


The iphone sextant DIY project

Build your own sextant

This the 3rd DIY sextant project published in this space. There is also the X-tant and CD-sextant.

The iPhone has an interesting set of sensors. Two of them are orientation sensors: a magnetic compass and gyroscope. They sense acceleration, gravity vector and Earth's magnetic field.

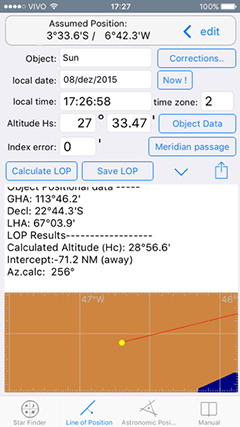
Navigator for iOS (v2.5+) uses these sensors to auto-orient the star finder chart. It also allows capturing sensor readings, so the phone can be used as a sextant. Sort of. Keep reading.

Navigator for iPhone/iPad
App Store

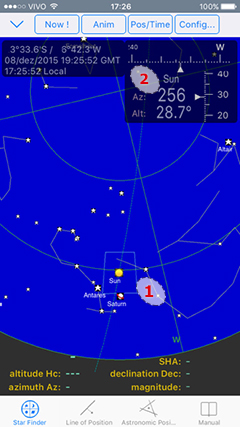
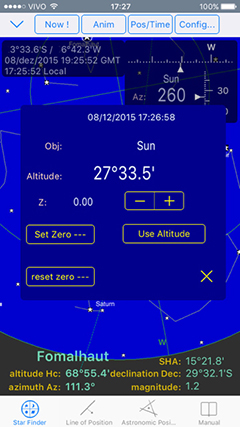
In Navigator star finder page, click [Config] and activate

[x]Auto Orientation.

The attitude panel shows (see number 2 to the right). It shows Azimuth, Altitude and name of pointed star (if any).

Set animation to current sky.

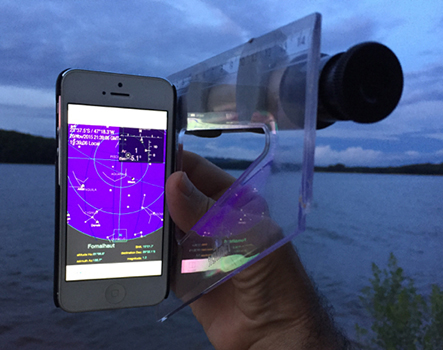
Hold the phone vertically, in portrait orientation. As you move it, pointing to the sky, the star chart moves accordingly. Keep the phone forming a right angle with the line of sight of the star.

A small rectangle shows in the chart to represent the phone attitude towards the sky (see number 1). Center the star on that rectangle to read its altitude.

Of course it is difficult to hold the phone steady in constant right angle with a bare hand...


iphone sextant in action with iPhone 5S and Navigator sw


my iphone sextant

To help fix that, I made the object below.
I used a plastic triangle ruler as frame, a telescope view finder and a phone case.

First cut off the triangle ruler point (otherwise there is an ugly point towards you - bad feng shui ). Glue the pieces together with epoxy glue and epoxy putty. This gave a rather solid setup. Make sure everything is perpendicular.

I used a couple Lego blocks to ensure the right angle between frame and phone case (the red piece below).


Lego blocks


Sextant frame without the phone


I found the gyro sensor error can be as much as one degree, not a very good sextant. It may improve in the future. A decent sextant has an error of a couple minutes. Still, it is pretty amazing.

More construction details and tips can be found in Instructables site here


So you still need a classic sextant for celestial navigation.


.Warning: Don't use any optical instrument to observe the Sun directly, unless you have a proper Sun filter installed in the eyepiece.

The UV rays can burn the eye, causing permanent loss of vision and other problems. Lenses in the instrument amplify the light power. Don't even think about observing the Sun without a filter.

Best materials for Sun filter are:

  • Aluminized Mylar film - this is a material specifically developed for solar observation. Can be found in science supply stores. Best material available.
  • Welder's glass - strong filter used in welder helmets. Difficult to cut, can be found in construction supply stores. Use shade number #14
  • Photography film. Use a dark negative, with metalic silver coating. This means black-and-white film. Color film does not contain silver and will not filter the UV rays. Photography film is a vanishing species.
  • Dark floppy disk media. Vanishing too.

The filter to the left uses welder glass #14. Most welder lenses are rectangular. I had mine cut square in a glass shop and made the eyepiece adapter with duct tape.

The shade must be removable, to take off when observing stars.


Altitude observation

Steps to get an altitude reading using Navigator for iOS:

1) When the instrument is pointed to the .desired star and s, tap the Attitude panel (number 2 in the image to the top). This will save the time, altitude and possibly the name of the pointed star.

2) Click [Use altitude] button to accept (see below). This will transfer the sight data to the LOP calculator.


3) Click [Calculate LOP] to calculate the Line of Position for the observation you just saved. The results are shown below.

4) If you like the result, click [Save LOP] button to save it for the astronomical position calculation.


Sextant calibration

Tap the atitude panel ( top right ) to bring the sextant panel ( blue panel above ).

You can set the Index error (calibration) of the sextant, using the [Set zero] and [Reset zero] buttons. Also [+] [-]

The Z: field denotes the Index error.

This will account and compensate for the sextant basic construction error. The number is subtracted from gyro reading to give the instrumental altitude.

One way to check the index error is to measure the altitude of the sea horizon. Should be near zero

Another is to use the phone GPS to set the assumed position for the observatiobn. Then compare the expected and observed altitudes of a couple stars.

In this case, you should get LOPs with intercepts close to zero.


Astronomical position calculated


Another addition to version 2.5 of Navigator is the world map in the situation charts. It uses GSHHS low poly chart (image to the left). Note that this is not a navigation grade chart. Just a visual reference.


Two lines, looks like we have a fix :)


related links

Celestial navigation fundamentals

X-tant - DIY Octant project

CD-sextant - Minimalist DIY sextant

Navigator for iPhone/iPad App Store

Navigator home

Instructables

Facebook page


- -- --- x --- -- -


©Copr 2015 Omar F. Reis