|
level
of difficulty |
beginner
|
intermediate |
advanced |
The CD-Sextant
Build
your own sextant
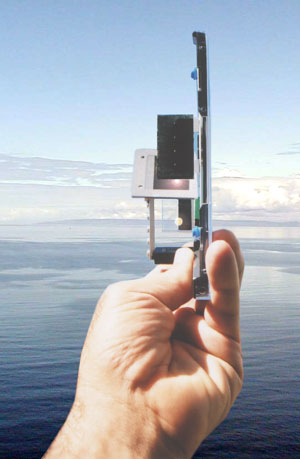
A few months ago I published the X-tant Project , a "do-it-yourself" sextant design. But the instrument construction requires some skill, electric tools, some hard to find materials and considerable work. So I went on to design an even simpler sextant, which is called CD-Sextant. This small instrument is built with an old CD and its case. As in the X-Tant Project, I used a few Lego blocks and glass mirrors. No electric tools are necessary to build a CD-Sextant.

The CD-Sextant (assembled and parts)
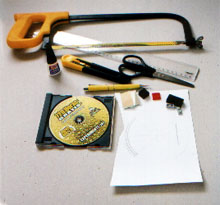
The needed materials are:
|
|
|
The design takes advantage of the dimensional precision of CD parts and Lego bricks. The sextant arm is the CD itself and the sextant frame is the CD box. The angle is changed by turning the CD.
Of course the small CD radius gives limited precision to the instrument when compared to larger sextants, but it is enough for celestial navigation practice. Because the instrument is so small, care must be taken in all steps (cutting, sticking etc) to achieve the best possible precision.
The CD-Sextant is not only useful for celestial navigation, but also in coast navigation, using simple trigonometric relations. And it is surprisingly strong (I have dropped mine a couple times, with pieces flying in all directions, and it is still working).
Vernier scale sextants
Minutes of arc are very small and reading them is only possible with a precise scale. There are two kinds of minute scales used in sextants. Modern sextants use a drum to trim the instrument and read the minutes. One full turn of this drum equals one degree ( or 60' ). This device requires sophisticated machining to build.
The CD-Sextant uses a vernier scale, a simpler but useful minute scale type. Since the CD-Sextant degrees are small ( due to the small CD radius ) I used a single 60' vernier (larger sextants usually divide each degree in three ticks of 20' ).
For more details on vernier scales click here.
Printing the Scale
The scale is the most difficult sextant component to do using traditional
techniques. Fortunately, most of us have a precise printing equipment
right on our desktop: an ink jet or laser printer. These machines can print
300 dots per inch (1200 for laser), with enough precision to print a sextant
scale.
|
Sextant scale printer program In order to achieve the best results, I wrote a small sextant scale printing program. This will print the sextant scale using vector rendering, for best resolution. This is the same program used in the X-tant project.
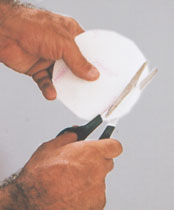
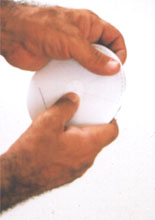
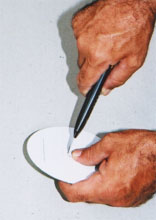
1) To print the CD-Sextant scale, run the program and check the CD-Sextant checkbox. 2) The CD-Sextant is a vernier sextant (see X-tant Project for more details on Verniers). In the case of the CD-Sextant, the small scale radius makes it impossible to divide the scale degrees into smaller ticks. Set the div/degree property to 1. This will give a scale with ticks only for full degrees and a 60' vernier. 3) Select your favorite font. Use size 7. 4) Press the [Print scale] button. 5) After printing, cut around the scale precisely. Don't cut the CD axis hole yet. Sticking the scale Sticking the scale is a critical operation. If the scale is not perfectly centered when you stick, you will probably have to remove it in pieces and print a new one. I did this:
Save the printed Vernier (the small scale). It will be the last thing to be stuck, after the mirrors are positioned. |
||||||||||||
Mirrors
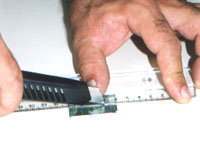
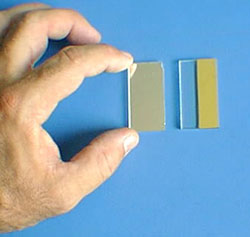
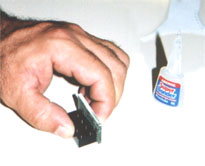
I used 2 equally sized glass mirrors (40 mm x 22 mm, 3 mm tick). Any glass shop will cut these for you. As you know, one of the mirrors must be half silvered. So you must remove half of the mirror silver backing. I used a paper cutter blade for this job (Olfa cutter).
 |
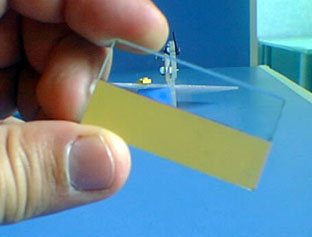
First make a sharp longitudinal cut along the middle of the mirror. Then scratch half of the epoxy protective layer from the back of the mirror, scratching with the cutter blade inclined. The epoxy backing is a hard material, but will come out with patience. Go easy and don't use any abrasive material or the blade point, to avoid scratching the glass. Once the epoxy is gone, the silver is easy to remove, rubbing with a wet cloth or thin steel sponge (the ones used to clean windows). In the end, the glass must be clear and scratch free (fig. below). |
|
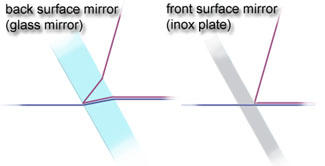
Note: You may be tempted at this point to use a thinner mirror and eliminate the transparent part altogether. Don´t do that. This would introduce a refraction error. The direct (horizon) light ray must pass thru the glass, as the light ray from the star does. This can only be done if you use a front mirrored surface, such as a polished inox plate. However inox mirrors are easily scratched. Glass mirrors are better. |
 |
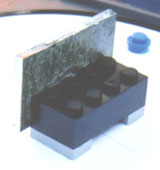
Mirror supports
I used Lego bricks to hold the mirrors. They have good dimensional precision and will guarantee a nearly correct 90° angle between the mirrors and CD parts. They will also allow the sextant to be assembled, disassembled, trimmed and parts to be replaced as needed.
Of course other materials can be used if Lego bricks are not available. Try to use dimensionally precise objects, to build the mirror supports with right angles.
Bonding the mirrors
CD Center mirror:
 |
1) Working on a flat surface, bond the center mirror back to the large side of a 2x4 Lego brick. Make sure the mirror is perpendicular to the flat surface. |
 |
2) Assemble the 2x4 brick over two 2x1
Lego plates (gray ones). The space between the plates will be over
the CD axis hole.
3) Bond the mirror assembly to the CD. A few things to watch here:
|
CD Box mirror (half silvered):
|
|
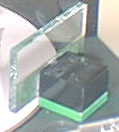
I used a 2x2 Lego brick mounted on a 2x2 Lego plate, to hold the CD box mirror. Cut the 4 brick bumps out, because they will be visible thru the transparent part of the half silvered mirror. 1) Working on a flat surface, bond the half silvered mirror to the 2x2 Lego brick. Make sure the mirror is perpendicular to the flat surface. 2) Assemble the box mirror brick to the plate. 3) Position and bond the box mirror assembly in the CD box corner. Make sure that:
|

Sticking the Vernier
At this point, your CD-Sextant is almost done. You must now stick the Vernier in 0° position:
1) Cut the vernier in a triangular form, to fit the CD box corner. I did stick the vernier on a blank sticker paper piece, in order to make the vernier paper ticker. This is important because the vernier edge will be unsupported.
1) Trim the mirrors (see trimming the mirrors below)
2) Turn the CD until the mirrors are parallel.
3) Hold the instrument in observation position, looking thru the half silvered mirror and focus on a far away object. Turn the CD slowly until the reflected image and the direct image coincide. This must be the instrument zero, so....
4) ...Carefully place and stick the vernier in the CD box, reading 0°00'. This means that the vernier tick A most coincide with the 0° scale line. On the other side of the vernier, the 60' tick must coincide with the 59° tick in the scale.
Make sure the vernier and CD scale are very close together. The vernier probably will be a little higher than the CD, and you might want to bend it down a bit.
|
Shades
As shades for Sun and Moon sights, I used 35 mm dark negative film (there is one in the end of every film roll). The negatives were mounted in slide frames. I used two layers of dark film for the Sun frame and single for the Moon. Both slide frames are removable and are attached to the instrument frame using Lego pieces. I did trim the lower edge of the slide, to make it thinner. The slide window must match the imaginary "tube" formed by the mirror edges. Edit: 2019 - Almost nobody uses this kind of photographic film anymore, so I recommend using dark "welder helmet" shades ( as in construction shop for shade number #14 )
|
||||

Trimming the mirrors
|
For simplicity, the CD-Sextant is not equipped with screws to trim the mirrors. But the mirrors can be trimmed by inserting small sticker paper pieces between the Lego brick and plates (or by sanding the brick) at suitable positions. First check the angle of the CD mirror (center mirror). As you look to this mirror, the reflected CD edge must be perfectly aligned with the edge you see outside the mirror (green arrows in the image). This must hold for all directions. The half silvered mirror can be trimmed by setting the instrument to 0°00', aiming to a far away object and making sure the direct and reflected images coincide. After this initial trimming, the Lego bricks will hold the trimming surprisingly, even after disassembled. Of course you must read the index error after each set of observations, as with all sextants.
|
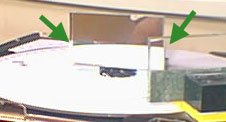 CD center mirror trim |
 Sun sight with the CD-Sextant |
Final touches Bond a round 1x1 Lego piece to the CD surface, to use as a turning knob (the blue piece). The CD may be hard to turn. In this case, rub the CD hole with a pencil. The graphite is a good lubricant, and will make turning the CD easier. This is important for fine adjustments. I made 8 such sextants.
-x-x-x-x-x- |
Bibliography
| >> "The American Practical
Navigator " by Nathaniel Bowditch ISBN 0781220211 - 1200 pages |
|
||
©Copr 92-2012 Omar F. Reis - All rights reserved